background

Thursday, June 30, 2016

More layouts...

It feels so good to get so many pages done! I have been doing my best to keep my layouts simple, tell the stories and highlight great photos. Doing this has caused my scrapbooking to go a lot faster! That and if I don't feel the scrapbook mojo, I do something else for a bit and come back to it.


Still scrapbooking scenes from traveling around in the RV. This section was Santa Barbara (probably my favorite place in the world), so obvs, I took tons of pics. 
xoxo,
Glynda

Tuesday, June 14, 2016

January 2015 Layouts

So, I have been working hard to "catch up" on my 2015 album. Really I want to get it close to being finished so I can hand carry it back to the US when we go in July. But, I'm only up to March. Aaah!! Nobody panic, I can at least take a separate album back with me and just relax about it. My word for the year is, BEGIN. It seems the best way to describe our year as hubby took a new job... His dream job after a very long wait to work at a particular company, he got the job.
Okay, so here are some of the first layouts in my 2015 Album:


More layouts coming soon! 
xoxo,
Glynda

Friday, May 20, 2016

Just back from Australia & Scrapbook room tour

G'Day! I've always wanted to visit Australia and for our 18-year anniversary and my ___ birthday, we went this year! We visited Cairns, Green Island and Port Douglas. We snorkeled, hiked the Daintree rainforest and held a Koala. Because when you are in Australia, you have to say, "take my money and let me hold that baby koala!"

Apple, the wallaby, visited the resort's open-air lobby some evenings. I wanted to bring her home.
As if to say, "This is my good side", while I took the picture.

Also, here are some pics of my tiny scrap space. I'm very thankful for what I have and when we saw this apartment here in Hong Kong, we knew it was perfect. It had built in shelves, for crying out loud! Ha!
 Above: The desk along side the window was a free computer desk. I needed extra horizontal space since I have the sewing machine on my desk as well.
 Above: I'm still organizing things where I'd like them. Some things don't seem to change much, as I have discovered the best way to keep my supplies to use them. Other things are a work in progress.
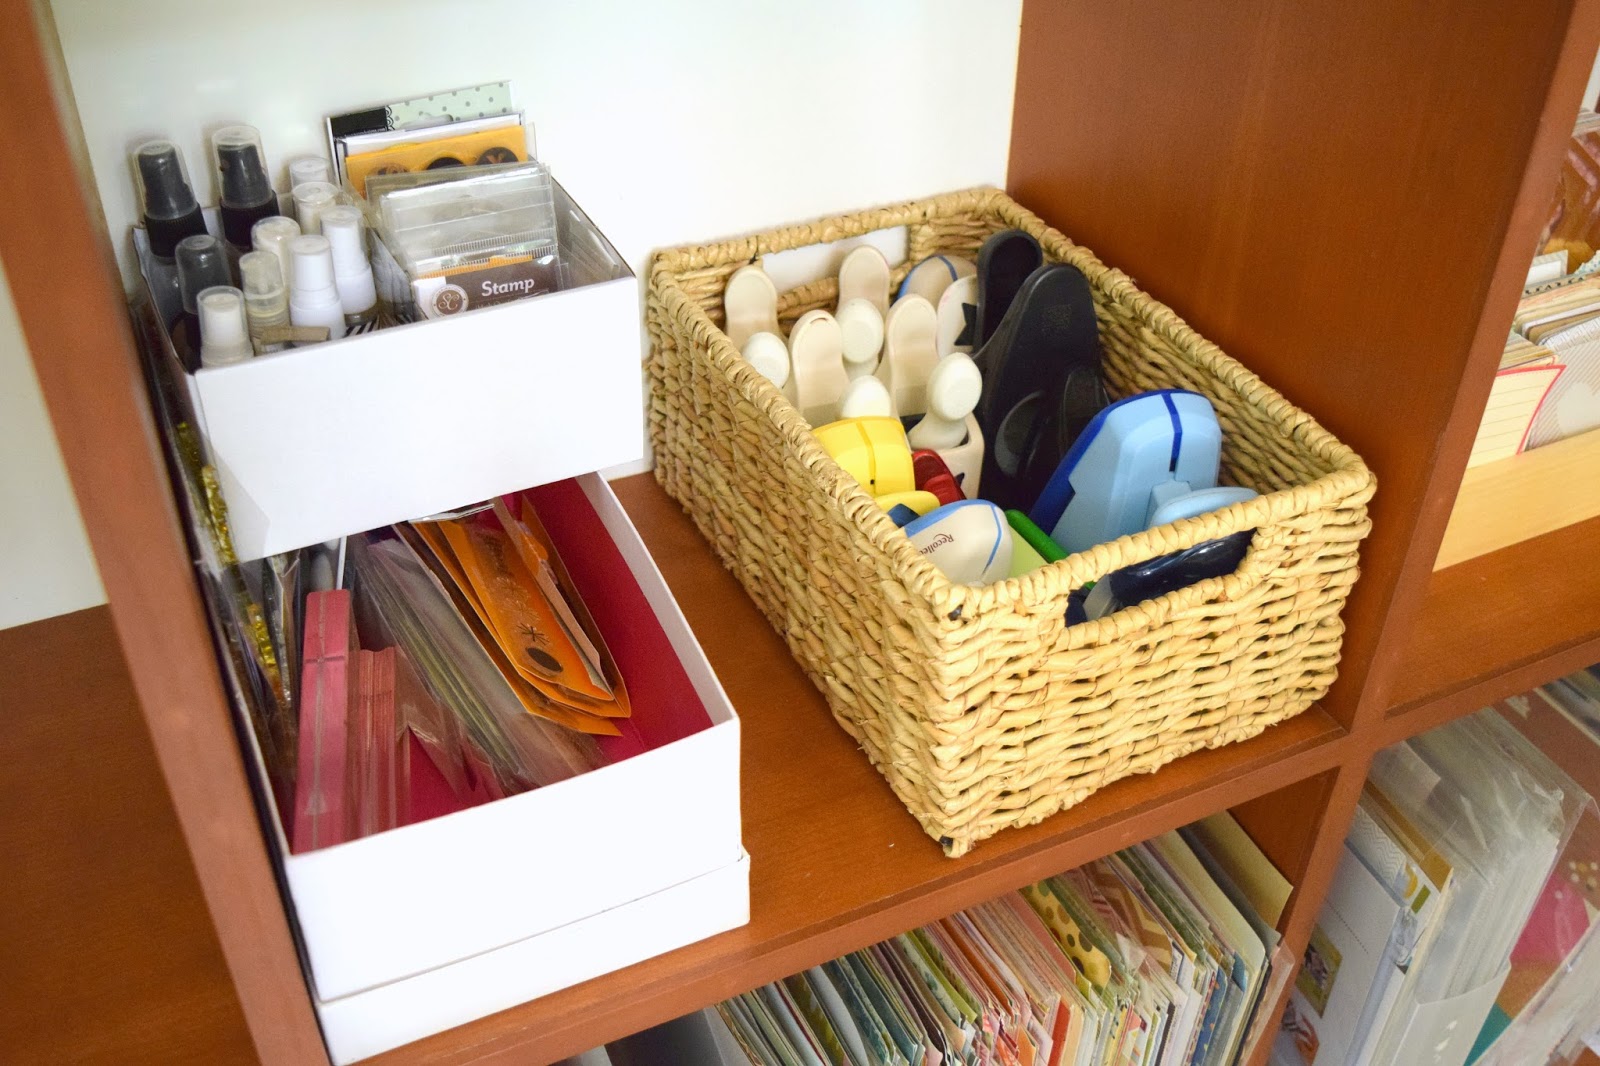
 Above: Since we were limited on how many pounds of stuff we could bring, I narrowed my stash down to 3 paper holders, 2 albums (blank for the years we will be here). The cubby to the right of the paper is where my sheet protectors are and some kit items and plain card stock. Then, my HK printer fits in the last cubby. Yay!

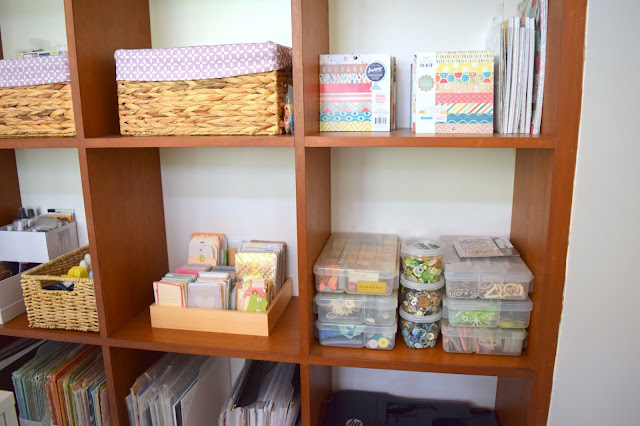
Above: Overview of most of the cubbies. Love this but-in!
 Above: Basket of punches, stamps and sprays. the stamps on the bottom are in disarray and I am currently looking for a better solution.
 Above: This usually gets moved to my desk while I make my Project Life stuff. It's actually a wood silverware organizer repurposed for my Project life cars, tags and small envelopes.
 Above: Here are my embellishments organized by color. This system has worked great for me for the past several years. I mostly scrap by color, so this is great. Below: Example of the Red, Orange, Yellow box of embellishments.


 Above: 6x6 and 8x8 paper pads. I use these a lot with my Project life stuff.
 Above: Alpha stickers, sorted by color, of course. :-)

 Above: This is my basket of "travel" themed items. While I almost always organize by color, this basket and my Christmas box of goodies are the exceptions.

 Above: Free computer desk! Yay! So, I have my scraps sorted by color and in 12x12 sheet protectors. Easy to reach for putting scraps away and getting the right color scrap out. I need to challenge myself to make a complete layout (or 10) using just scraps!
 Above: Top of my desk has my new 3x4 punch (love it), new embellishments, planner labels, date stamps, and tools.

Well, that's about it! I am still figuring a lot of it out, but so far this mostly works. Let me know if you have a great organizing idea! I'd love to see it!

xoxo,
Glynda


Friday, April 29, 2016

DIY Planner

So, this cute planner is something that you can whip up in an afternoon and customize however you please. I purchased this cute notebook from TJ Maxx for about $5 and used a free printable calendar. I also printed my own titles for pages based on what I want to use the planner for. I used some tabs by Smash book for the monthly tabs and stamped the months with Staz-On ink.


So, if you want a planner, but don't want to spend a ton of money, this is a great alternative! Let me know if you have any questions.

xoxo,
Glynda

Sunday, April 24, 2016

How to add Text to your Photos

So, I've learned a new trick and thought you might like to know how to do this as well. It is super easy and I used a free program, Picasa. I love this because I can use a photo for my title in my scrapbook album!

Let's get started. First, choose your photo...

I chose this beach-y one for my Cebu trip. See the tabs on the top left? You want the tab with the wrench (Commonly needed fixes).


Next, choose the button that has the ABC on it (Add/Edit text on a photo).

 Once you click that button, you can type on your photo.

 A text box will appear once you start typing. Don't panic, it will disappear once you are finished.

 After you type the text you want, drag the box to the location on the photo you would like the text to appear.

With the options on the left, you can change your font, font color, font size...


When you have it the way you would like it, click "Apply" and the text box disappears.

 As a habit, I typically save this as a copy so I still have the original, wordless photo. To do this, go to File, Save a Copy.

Now, when you get your photos printed, this will be one less title you will have to create when scrapbooking! If you have any questions, please let me know; I'm happy to help! 

xoxo,
Glynda